
 AdabStars
Get started with your AdabStars Board
Everything for setting up your Board: a quick start, how to mount it on the wall, and the full manual.
Quick start
About five minutes. You can do this before or after mounting.
1Get the AdabStars app on your phone
Do this first. Sign in with your family's AdabStars account (new to AdabStars? Create one at app.adabstars.com), and you can approve tasks and finish setting up from your phone.
 Get the AdabStars iPhone app
Approve tasks from anywhere. Scan the code with your iPhone's camera, then sign in with your family's account.
Download on the App StoreAndroid: open app.adabstars.com/parent in Chrome and add it to your home screen.
2Plug in and connect
- With the plate off, plug the power cable into the Board, then into the outlet. Leave it plugged in. It's made to stay on.
- Mounting on the wall? Leave the plate off for now: it goes on the wall first (see Mount it on the wall). Using the stand? Slide the plate back on and put the 2 screws back in.
- Pick your language, then join your home Wi-Fi.
- AdabStars opens on its own when setup finishes.
3Sign in and update
- Sign in with your family's AdabStars account. New to AdabStars? Create one at app.adabstars.com.
- The Board stays signed in, even after a restart.
- When the Board offers an Update, tap it. Updates add features and fixes and keep your settings.
4Set your prayer times
Open the Parent Console: tap the gear on the Board, or press and hold the clock.
- Settings → Prayer & Athan: your location, calculation method, Asr, and which athan to play.
- Settings → This Board: athan volume and speakers for this tablet.
- Want the Parent Console locked? Add a Parent PIN in Account & Family.
5Add your kids and tasks
- Kids: add each child with an avatar.
- Tasks: pick daily tasks for morning, afternoon, evening and bedtime.
- Rewards: what stars can be spent on.
- Game night? Tap the Game Night card on the Board and scan the code with each phone, then tap your name. You can also start it from your phone: Parent Console → Family → Game Night. Don't want it? Turn off Game Night QR in Settings → Family Board.
6Memorizing Qur'an? Use Hifdh
Open hifdh.adabstars.com on your phone and sign in with your AdabStars account (on the Board: Hifdh in the Parent Console menu). It plans each child's new lesson and reviews every day, and shows them on Duas & Learning and the Board.
Download the one-page welcome sheet (PDF)
Video guide
An 8-minute walk through setup and the features families use every day: the family calendar, the athan, speakers, the Board Light, themes and screensavers, tasks and stars, approvals, Kids' Bank, Qur'an, Hifdh and Game Night.
Chapters
- 0:00Welcome
- 0:13Where the power socket is
- 1:06Sign in and update
- 1:22The main screen
- 1:47The family calendar
- 2:10Countdown to the athan
- 2:38Athan on your speakers
- 2:52Board Light
- 3:18Bigger text
- 3:32Themes and screensavers
- 4:21Add your own tasks
- 4:45Taking stars away
- 5:04Approvals and the Parent PIN
- 5:32Kids' Bank
- 5:58Qur'an for kids
- 6:12Fridays on the Board
- 6:35Hifdh: memorizing the Qur'an
- 7:29Game Night
- 7:50Finding anything
- 8:09We're here to help
Mount it on the wall
About 30 minutes. Two people make the last step easier.
In the box
- AdabStars Board, with the wall plate attached to its back
- 2 small screws (on the side of the Board, holding the plate)
- 6 screws and 6 plastic drywall anchors
- Power adapter
- Tabletop stand (2 parts) and its 3 small screws, in the hardware box
You'll need
- Drill with a 7/32 in (about 5.5 mm) bit for the anchors
- Screwdriver or drill driver
- Tape measure, pencil and a level
- Stud finder (optional)
- Cable grommets (optional, only to hide the cable)
1Take the plate off the Board
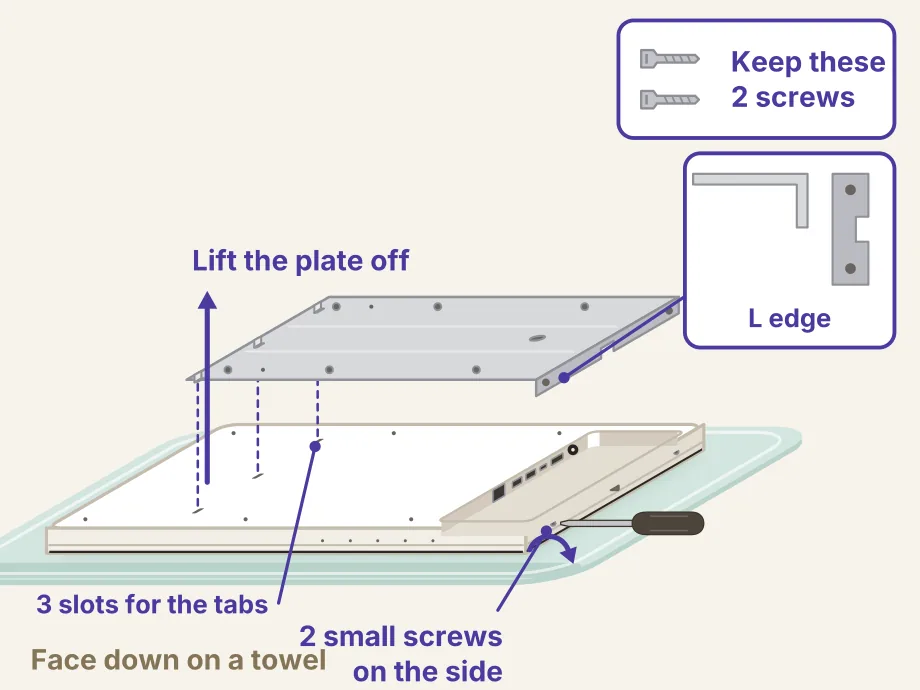
Lay the Board face down on something soft, like a towel. Unscrew the 2 small screws on the side and lift the wall plate off. Keep those 2 screws: they go back in at the end.
2Choose the spot
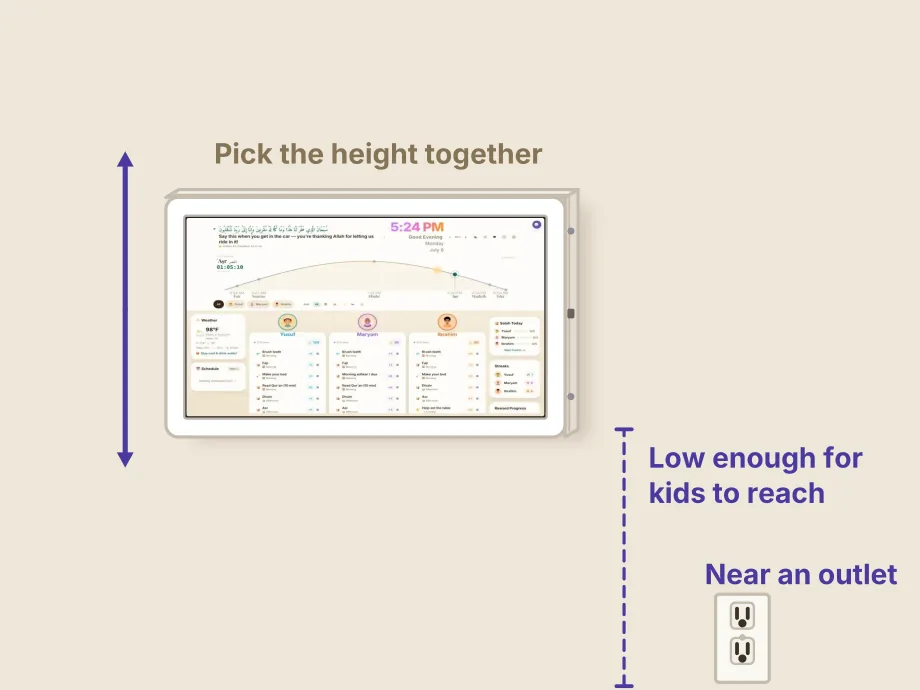
Pick a wall near a power outlet. The height is your family's choice: low enough that your children can easily reach and tap the screen. Hold the Board up and let them try before you mark anything.
3Center it on the wall
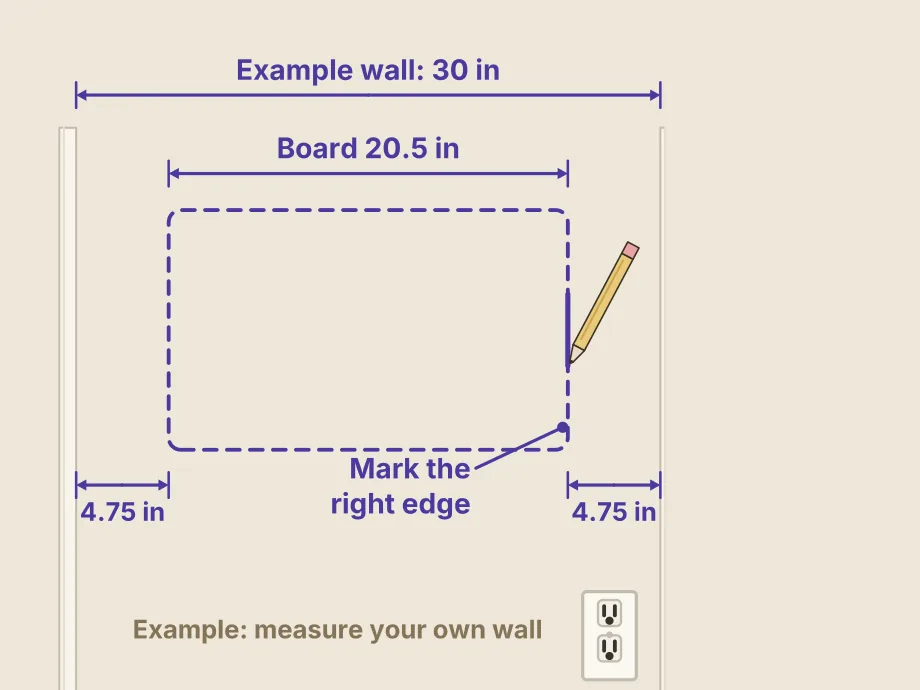
Measure the wall's width, take away the Board's width (20.5 in, 52 cm), and halve what's left. That's the gap on each side.
9.5 ÷ 2 = 4.75 in on each side
Mark where the Board's right edge will be (in the example, 4.75 in in from the right).
4Place and level the plate
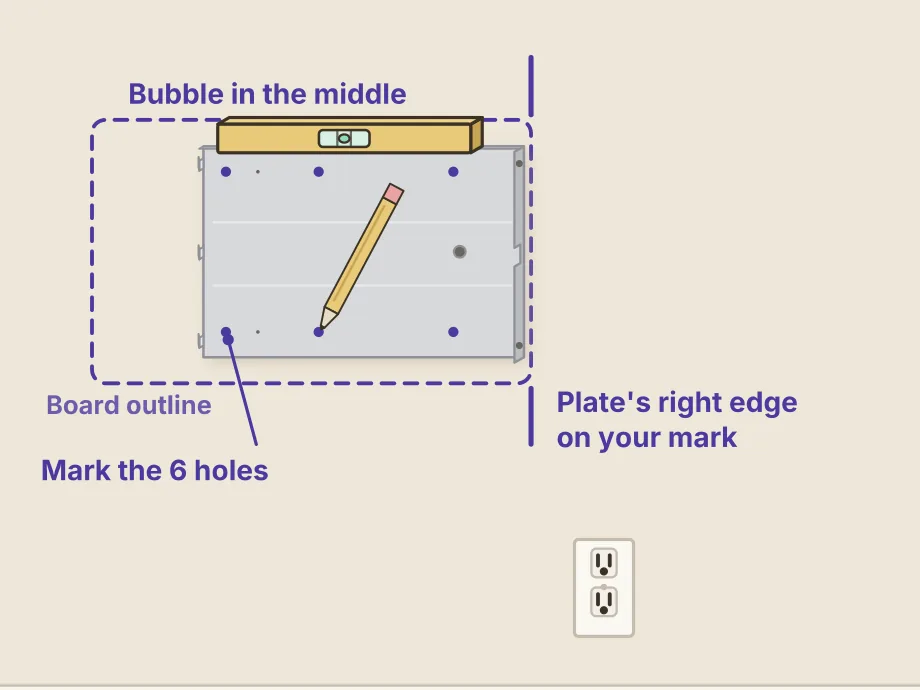
The plate sits toward the right side of the Board (it covers about three quarters of its width). So put the plate's right edge on your right-edge mark, at the height you chose. Level it (bubble in the middle), then mark the 6 screw holes.
Tip: use a stud finder. Wherever one of the 6 screws can go into a wall stud, put it there: the more screws in studs, the sturdier the mount (use longer wood screws in the studs). The anchors hold the rest in drywall.
5Plan the power cable
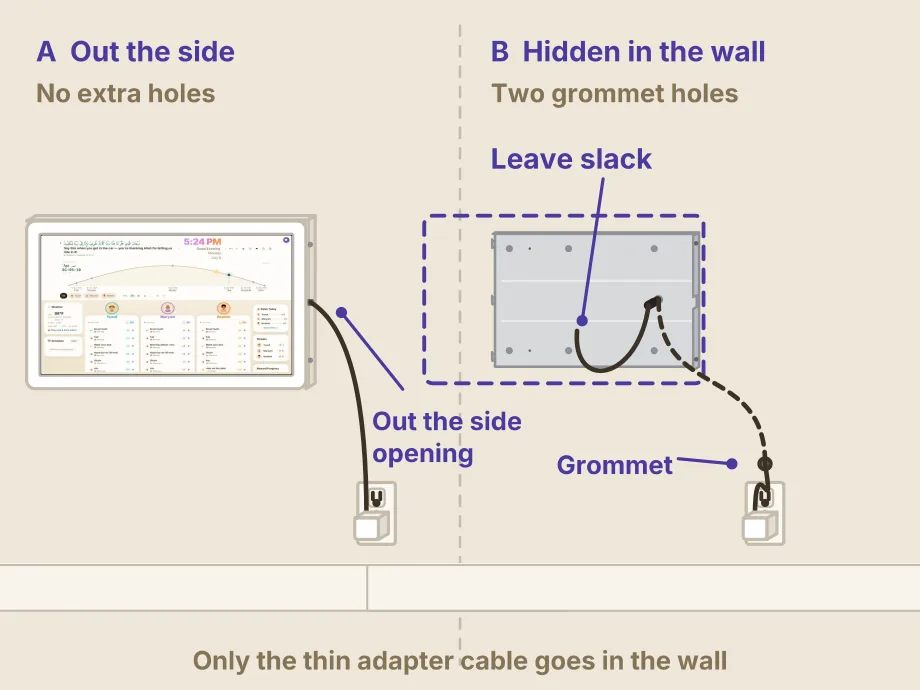
- Simplest: the cable comes out through the opening in the middle of the plate's right edge, on the Board's right side, and runs down to the outlet. No extra holes.
- Hidden: mark the plate's round cable hole too. Cut one hole there and one just above the outlet, fit cable grommets, and feed the cable in through the bottom hole first, pulling it up with a stick or string. Leave some slack: enough cable should come out of the wall to reach the Board's power socket while you hold the Board in front of the plate.
6Drill and fit the anchors
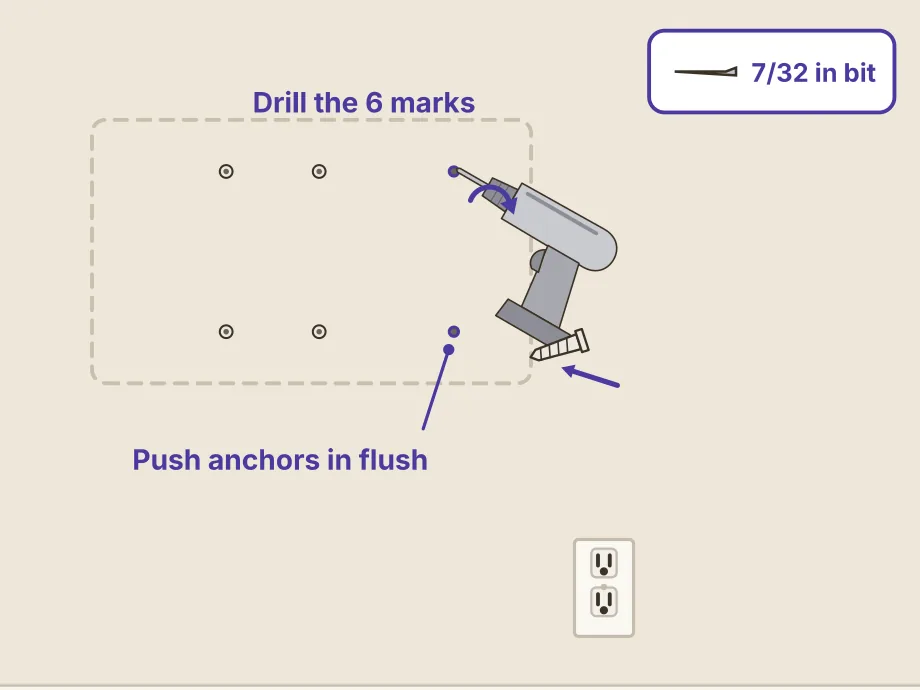
Drill the 6 holes with the 7/32 in bit and push a plastic anchor into each one until it sits flush.
7Screw the plate to the wall
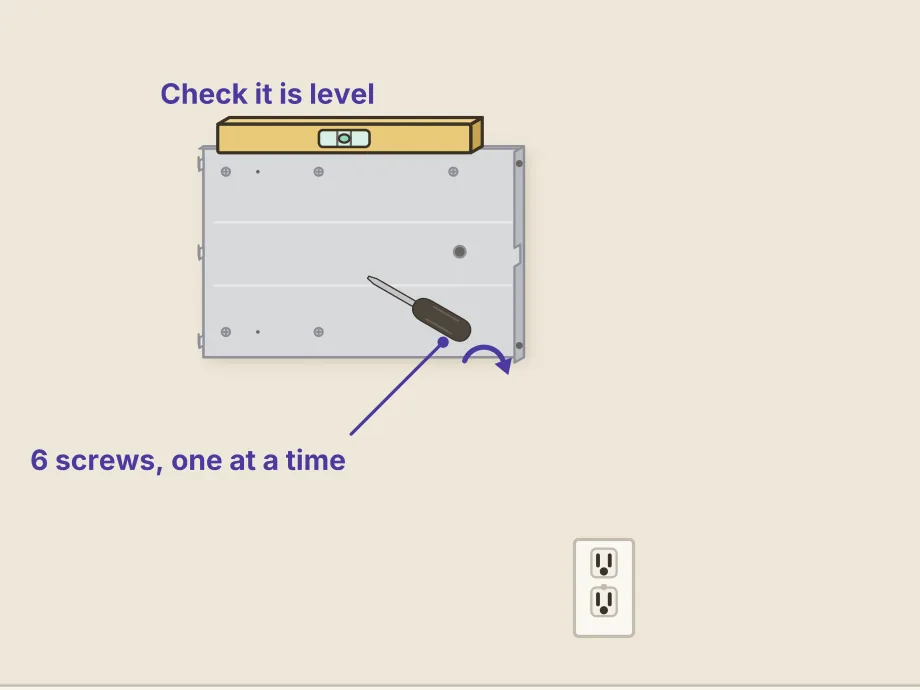
Hold the plate on your marks and drive in the 6 screws, one at a time. Check it's level before the last one.
8Slide the Board on and lock it
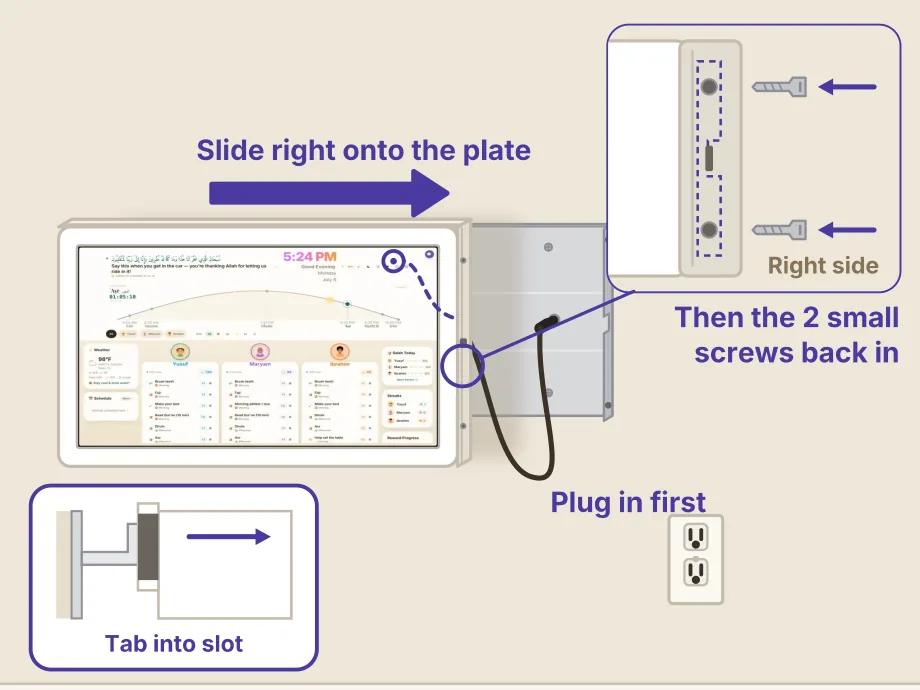
Plug the power cable into the Board first. Once the Board is on the plate, you can't reach the socket. Then slide the Board onto the plate so the plate's 3 tabs hook into the 3 slots on the Board's back, and the plate's L-shaped edge fits along the Board's right side. Line up the holes on the right side and put the 2 small screws back in. That holds the Board and plate together.
9Plug it in
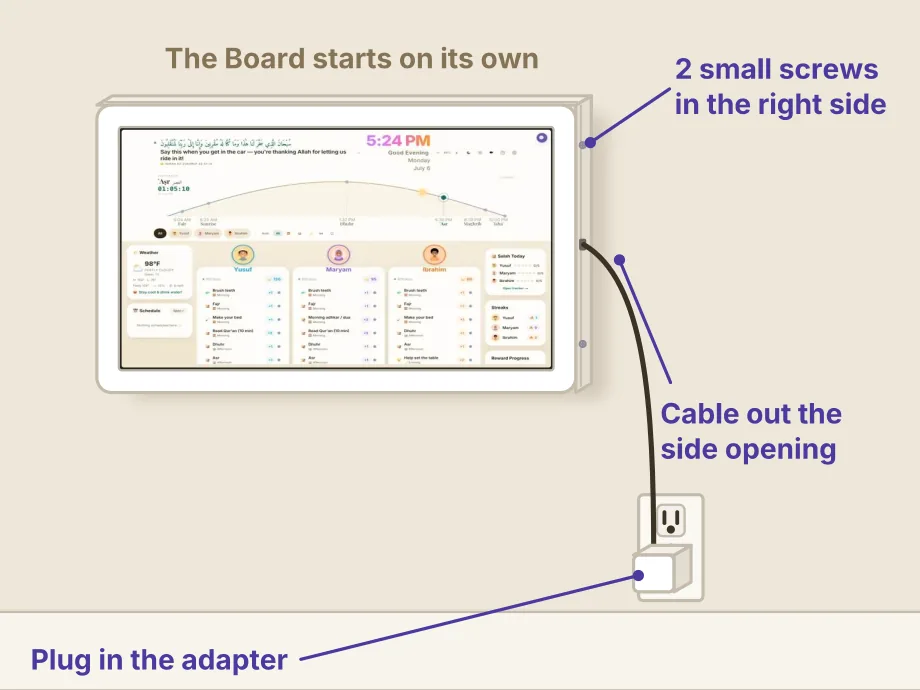
Plug the adapter into the outlet. The Board starts on its own. Then follow your welcome sheet: language, Wi-Fi, and sign in.
Use the tabletop stand
Prefer a shelf or counter to the wall? The stand takes a few minutes and a screwdriver.
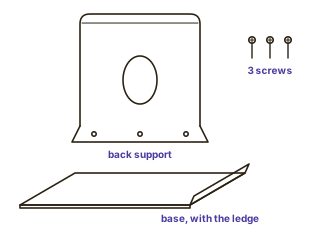 Find the two stand parts and the 3 small stand screws in the hardware box.
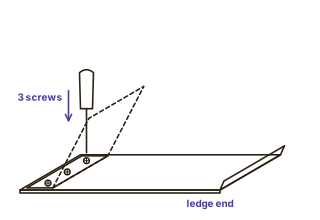 Lay the base flat, and set the back support's foot on the end of the base without the ledge, with its 3 holes over the 3 holes in the base.
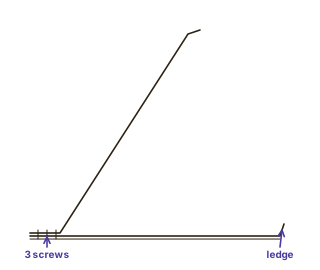 Screw them together with the 3 small screws.
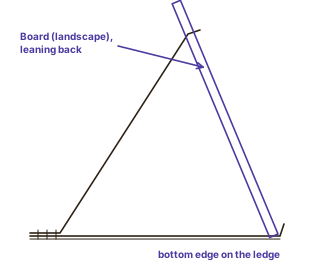 Plug the power cable into the Board first: the socket is behind the wall plate, so take the plate off (2 small screws on the side), plug in, then slide the plate back on and refit the 2 screws. The plate stays on for the stand. Then, in landscape (the wide way), rest the Board's bottom edge on the base against the ledge, and let it lean back on the support.
Full manual
The complete AdabStars Board manual: setup, wall mounting, every setting, prayer times and the athan, speakers, the Board Light, troubleshooting and more.
Open the full manual (PDF, 58 pages)
In the app, Search settings at the top of the Parent Console and the guided tour in Settings → Help are quick ways to find things too.
Help
- Tap Feedback in the app, or email [email protected].
- Something not working? Settings → Help → Send diagnostics and share the support code with us.
- After a power cut, the Board restarts and opens on its own, and the athan still plays if the internet drops.